Mastering the game design model
Since the creation of HacknPlan, our main goal was to provide game developers with a tool that could make planning projects easier and more intuitive. With this objective in mind, we came up with an idea to build a system that could be used to create a GDD (game design document) in a more dynamic way than traditional documents or wikis, and integrate this design with the tasks that would bring it to life. That’s how the game design model (GDM) was born.
But, how can you take the most advantage of the game design model for your projects?
What does it do?
For a moment, think about what you would put in a traditional game design document. What does come to mind? You probably are thinking about long documents containing a detailed description of the mechanics of your game, characters, storyline, levels, user interfaces… These documents would be linear descriptions, probably divided by topic, including images, sketches, and annotations.
What’s the problem with this approach? Well, in a perfect world, you’d create your design document and then proceed to build it, implementing what was designed step by step using the document as a reference, and then your game would be finished and ready to release. However, both you and I know that’s not the reality of the development of a game. In the real world, your design is gonna change. A lot. You will try different things, pivot, redesign parts of your game, reduce the scope (most likely), and come up with new features or ideas along the way… Probably, if you use an agile approach to development, you are not going to create a complex GDD from day one and use it as a bible, but build it iteratively as the project grows and the requirements are clearer.
The Game Design Model was born with the mission of making your game design documentation alive, easier to keep up to date, and, most importantly, closing the gap between the documentation and the actual implementation of that design by integrating tasks and user stories with it. This takes your documentation to a whole new level because it’s not just documentation anymore, it does have context and status now. You can track the progress of a certain feature you designed (the battle system is implemented at 75%), set deadlines (the main character work should be completed by October 27th), and track how much work you put into something (the second level took 55 hours to complete, out of the 35 hours we estimated initially). Also, you can add comments to specific parts of the documentation, so you can discuss new features, or changes, with your team and keep track of it. Cool, right?
How does it work?
You now get the concept of the game design model but… how does it work exactly? The game design model is a tree structure, and each node of the tree can contain documentation, tasks, comments, attachments… and also other nodes as children. We call these nodes game design elements (or just elements, for short). Think of it as a folder structure containing files, where each file (or even folder!) can contain documentation and information about how that specific piece of the design should be implemented and its current status. The best thing about this tree structure is that, exactly as files, you can edit the elements, move them using drag and drop, copy them, or delete them… allowing you to have full control of the documentation and its related data in a very intuitive way.
Let’s see how this works with an example. Imagine you are building a small Sonic the Hedgehog clone (I’m sure your project is more exciting than this haha). Our first job is to create the top levels of design elements, that will contain the rest of the elements and tasks. It would look like this:
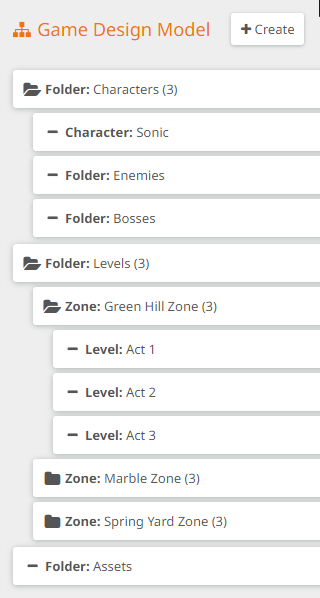
As you can see in this structure we created, there is a word preceding each element, such as Folder, Zone, Level… These are called game design element types (element types for short) and are a way to categorize each element depending on its purpose. There are some default element types, but you can customize them to fit your game design.
The top elements we created are all folders, meaning they are just containers of other elements. The first one, called Characters, is a container for the design of all the characters in the game. Inside it, we have an element for the main character Sonic (with its respective type) and also a few other folders, where we will have elements for the enemies and bosses of the game. You can also take a look at the Levels folder; we created three elements of the type “Zone”, equivalent to the three first zones of the original game, with three elements of type Level, corresponding to the three acts of each zone. Also, we created a folder called Assets, which will contain general assets of the game that are not specific to a level or zone, such as rings, checkpoints, springs…
Now that we have this first layout of design elements, let’s focus on the Sonic character element for a moment. There is no right or wrong way to structure a design model, and you have to evaluate which method is better for your game, if you prefer fewer elements containing a lot of information, or subdivide them more and have smaller bits. In this example, I’ve decided to put all the player mechanics under the Sonic character for simplicity, but you could have also created a Mechanics folder and separated the mechanics from the character itself, either under it or at the root level.
We can now open our Sonic character element and start adding some documentation to it. In the description of the element we can write about the character, what he looks like (adding pictures or sketches too, as attachments), what he can do (running, jumping, spinning…), how health works, etc. As I said, you can write everything here or subdivide the element into something like this:

It all depends on how complex you want your design model to be; while keeping it simple could help it be more manageable, making it more granular could give you better insights and metrics about the progress of each individual part once you start adding tasks to these elements. You need to find the sweet spot for your use case.
Adding work items
So, now that we have a design element for our main character, let’s add some tasks to it! Here is where the magic begins. What kind of tasks can I add to the element… you might be wondering. All kinds of tasks that will bring your character to life! As you probably know already, HacknPlan provides a categorization of the tasks depending on which discipline of game development they belong to; it can be programming, art, sound design… Whatever you can think of. You can add tasks about drawing and animating the character, tasks to create every sound he makes on each action, programming tasks to implement player control and behavior… As you can see, the list of tasks can get long, so subdivision into child elements is your friend in this case. You can also add user stories that group tasks that belong to the same feature to implement.
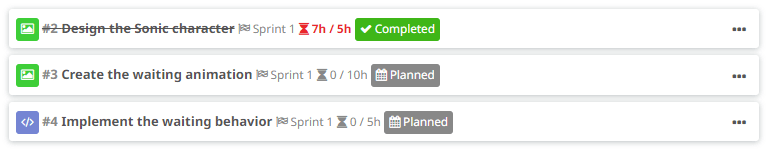
Take a look at this example; we have created several tasks directly attached to our character element:
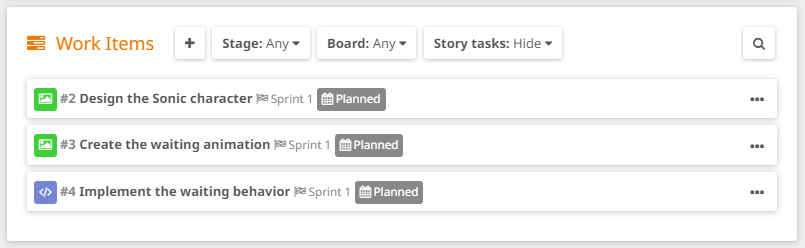
We created two art tasks, one for designing the character (obviously we all know what Sonic looks like but let’s assume we had to design it), and this cute animation of Sonic being impatient that is run when we don’t do anything for some time. Then, we also created a programming task to implement that waiting behavior, which basically runs the animation when x seconds have passed without player input. As you can see here, we could have just created a design element for the waiting feature, containing those two tasks, but we decided to add them to the character element directly, for simplicity.
Here, you have a decision to make regarding where to put the actual description of how that feature works: you can describe it in the description of the design element, you can describe it in the task that would implement it, or you can just have it copied in both places. If you put the technical details in the task, you are keeping your documentation at a higher level, it depends on how technical you want your design documentation to be.
Now that we have tasks assigned to the design element, this happens:

Do you see what’s different? A progress bar has appeared next to the Sonic element, as well as its parent. When you start adding tasks to elements, you can also start to measure the progress of that element. The progress bar is calculated based on the number of tasks, so if you have let’s say 10 tasks assigned to an element and 5 of them are completed, it will show a 50% progress.
Before we continue with the progress example, let’s add some estimated costs to our tasks. The estimated cost is used to measure how much time or effort (depending on how you set up your project) you estimate your task will take. This is very useful to compare it to the actual cost of the task once it’s completed, see how well you estimated your work and learn from it.
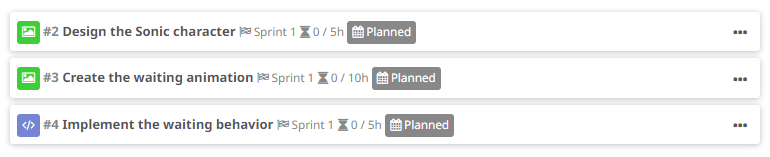
We added some estimated hours to each task in our Sonic design element, as you can see in the task cards, next to the hourglass icon. Now, let’s say we complete our task to design the character, but it takes us a bit more than planned, let’s say 7 hours. It looks like this now:
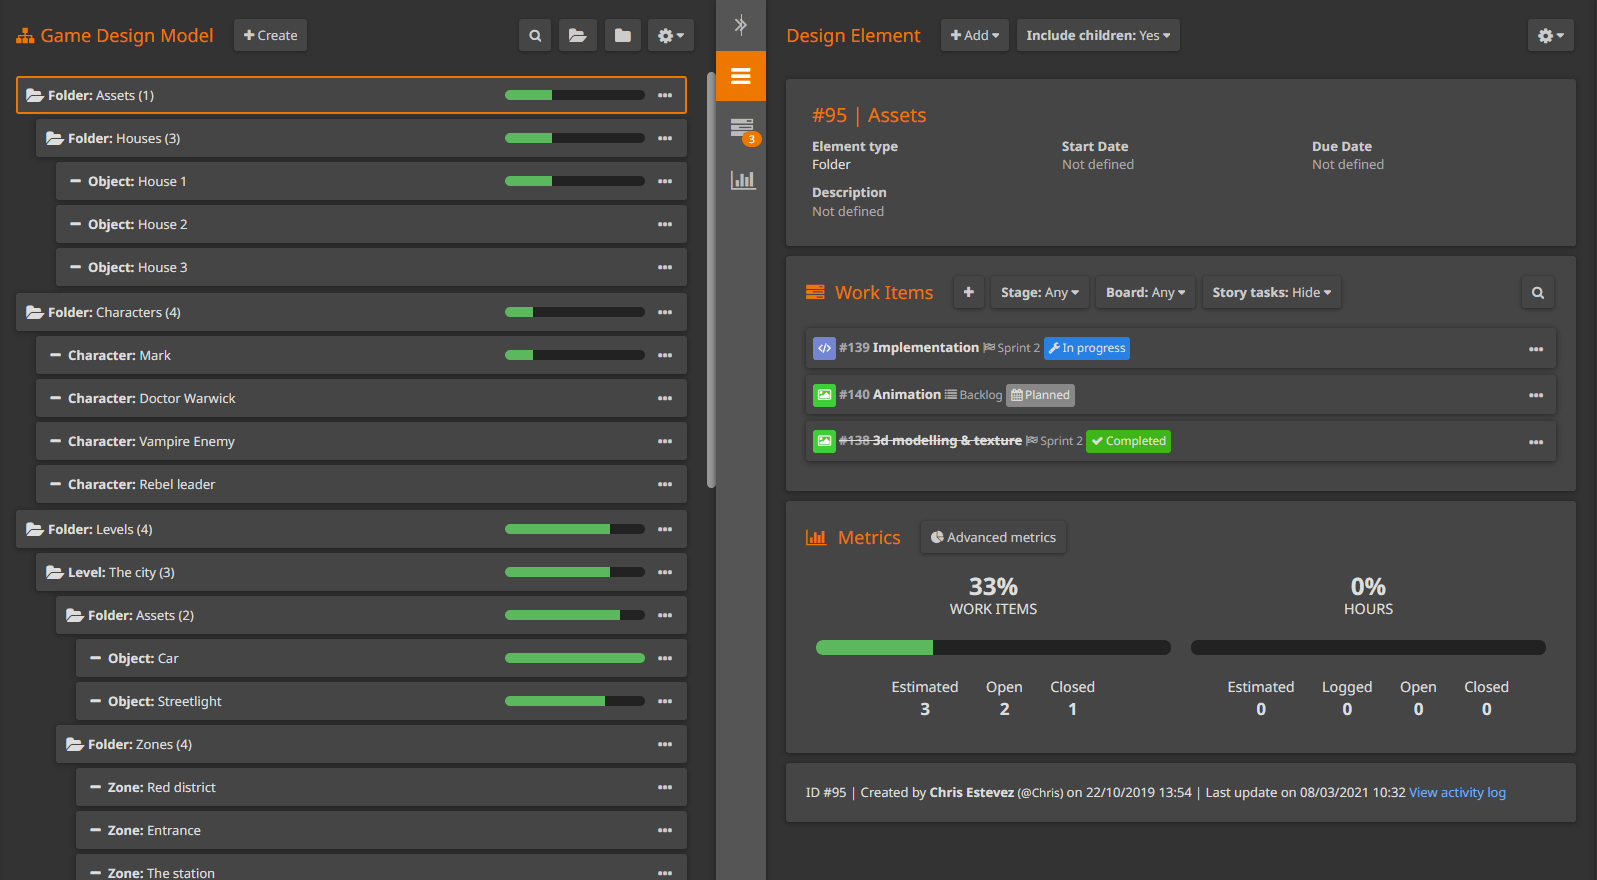
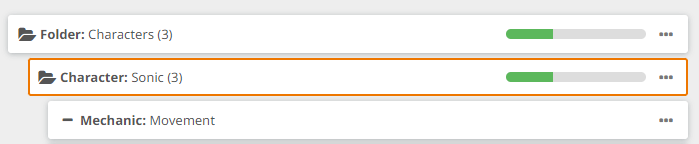
What happens to our design element then? You can see both the Sonic element and its parent display a 33% progress:
Also, if you open the Sonic design element, you can now see some metrics about its progress:

The 33% of work items (a work item is a unit of work, a task, or a user story) are closed and you can also see that 25% of the estimated hours are complete. Note that this value is calculated based on the estimation of the closed items, not the logged cost. This way, when you close all items, it will show a 100% completion even though it finally cost more than it was estimated. In that case, the Logged value will be displayed in red, indicating everything is closed but it wasn’t accurately estimated.
This way, once your design model is in place and you start adding tasks or user stories and progress on them, you can get a very useful overview of how your project is going from the design point of view, and you can see which parts of your game are completed and what is still in progress.
Design elements vs User stories
One thing that you guys ask us a lot is whether you should use design elements or user stories to define features to implement. And, well, the answer is the classic “it depends”. Honestly, for the most part, it is a matter of taste, both ways could work well depending on the type and size of your project, or your preferred way of managing things.
In HacknPlan (and in most agile or Scrum-based systems), a user story represents a feature to implement; some work to do that adds value to the product (the game in this case). Normally, these user stories contain a high-level description of what they want to accomplish from the player’s point of view; it is very common to define their description as something like “As a player, I want Sonic to jump when I press the A button”. So, you see why the confusion, right?
If we take the approach of building our game design model in a very detailed way, creating lots of levels and subelements, probably your last elements will define features. For instance, let’s go back to the Sonic example; in one of the examples, we created one child element per action the player can perform, such as moving, jumping, spinning… Following our advice, you would describe how it should work in the description of the element, and then create a few tasks linked to it such as “Create the jumping animation”, “Design the sound for jumping”, “Implement the jumping functionality”, and so on. But, if you read carefully how we defined user stories, we could just not create those elements per action, and just create some user stories like “Jumping”, “Spinning”… and assign them to the Sonic element directly. Those stories, most likely, would contain the tasks we mentioned before as story tasks. What’s better?
Both can work, that’s for sure, but there are some recommendations we can make to help you decide:
- How big is the feature? Is the feature small enough to be implemented within the scope of a sprint or iteration, or is it bigger and should be split among several iterations? If the feature is too big, then is better to define it as a design element. Why? Because user stories are work items meant to be accomplished in one iteration, they can’t be split, they are supposed to bring value to the iteration when it is complete. In this scenario, it would be better to create a design element and then several user stories (or just a bunch of individual tasks) under it to distribute them in several iterations.
- Do you want the details of the implementation of the feature in your design document? Our GDM can be exported to several formats, with the purpose of sharing it with investors, shareholders, publishers, or other parties that might be interested in it. If you want the details of the feature to be exported with the document and be part of the design structure, then creating a design element is better. You can always have a design element and a user story with the same information, but that could be a bit cumbersome.
Useful tips
Managing the design model of a big project can be challenging and time-consuming, as it grows and become complex. These are some tips that can help you be more efficient:
- Use keyboard shortcuts: You can create new elements by pressing E on your keyboard. If no design element is currently selected, the element will be added to the root of the design model, otherwise, it will be added as a child of the selected element.
- Subdivide wisely: Creating levels in the design model tree can be useful to represent the design of your project accurately and get better metrics from it. However, make sure you don’t go too far; creating too many levels of design elements can make the management of the model very complex, having to go deep in the tree to find what you are looking for. We recommend no more than 5 levels of depth, as long as possible.
- Use the search tool: This is very much related to the previous point. Do you see this small lens icon on the header of the game design model section? By clicking on it you can write terms to search for in the game design model. Actually, it works more like a filter, you can enter the name of the element you’re looking for, and only the elements (and their parents) which match the terms will be displayed. This is very helpful to find elements once the model becomes big and complex.
- Create references: If you used the design model before, perhaps you have faced the situation when you have to decide where to put a specific element that could be a child of several parents because, yes, sometimes they overlap. What to do in this case? Some people have requested a graph approach to represent the design model, with N to N relations between nodes. As cool as this sounds, we believe it would be just too complex to manage. We think our tree approach is more practical, even though sometimes it can’t reflect everything perfectly. In this case, you have to make a decision: which parent is more relevant? After you decide and place the element, you can reference the other possible parent by creating a link in the description, just type the % symbol on the description and select the element (with the help of autocomplete). This way, you can create alternate links between elements in different branches of the tree that are related in some way.
- Add comments: We strongly recommend having discussions regarding design in the comments section of the elements. Why? These conversations normally contain a lot of valuable information about the design, ideas… sometimes you even need to go back to them because the chosen path didn’t work out and have to try something else. Don’t let these conversations bury in an infinite Slack, Discord or Whatsapp group chat. By having them in the comment section of the design element, you make sure the conversation is stored, classified, and easily queryable when you need it.
The future
Being one of the central parts of our service, we have great hopes and plans for the future of the game design model. These are some of them that will come in the next iterations of our software:
- WYSIWYG editor: Currently the documentation has to be written using Markdown syntax. This, although loved by many, is not everyone’s cup of tea and is certainly limited in terms of formatting. We plan to add a rich editor for the documentation that will allow you to use colors, sizes, edit and place pictures freely… in a very intuitive way.
- Video and audio support: Not much else to add, you’ll be able to upload and reproduce video and music directly from the design element description.
- Better design: We will redesign the interface to be prettier, faster, and more intuitive.
- Tag support: Design elements will support tags for better categorization. Also, element types will get icons and colors so they are easier to find and organize visually.
- Custom fields: This is one of our favorites… Currently, the element type is nothing but a tag, a categorization name you add to an element. However, this will change when we allow defining specific custom fields in element types, including hierarchy and sub-types. Imagine you are building an RPG… wouldn’t be great to define fields in your Character type such as strength, constitution, stamina… This would mean a whole new concept for data-heavy games, allowing you to combine the documentation and planning of your game with a structured database of characters, items, objects…
I hope you have learned new concepts or came up with ideas about how to improve the management of your game project using our game design model. Make sure you leave us a comment with your impressions, ideas or suggestions below, so we can continue improving this tool.
Happy planning!
Useful documentation: